ExpressLRS - useful information, documentation, overview
9 Окт 2021, 14:35
Table of Contents
What is ExpressLRS
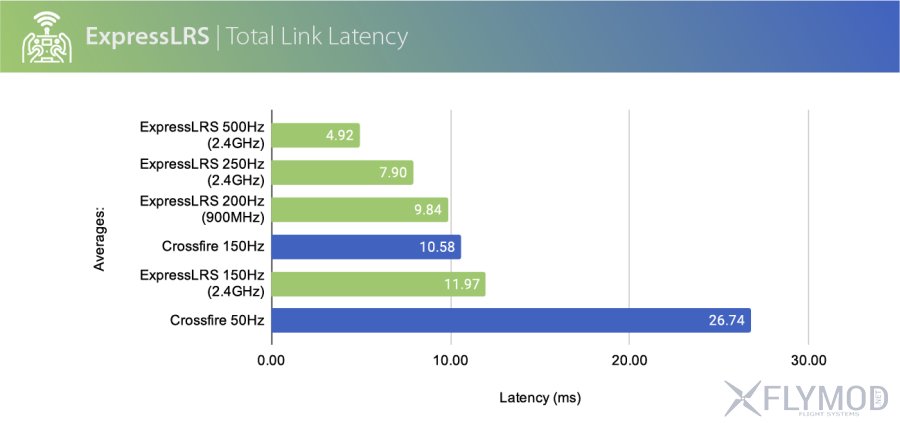
ExpressLRS is a radio control system that is being developed by the community as an opensource project. It features a high packet update rate, providing an impressive radio communication range. It is available in two frequency ranges, 2.4GHz and 900MHz. The project also implies that many receivers and transmitters can be made by the user (in the list of DIY devices). Already now ELRS works no worse than analogs such as Crossfire, FrSky R9m, not inferior to them in communication range and even surpasses them in some tests. It has the leading speed of packet exchange among competitive systems at the moment.
Comparison of radio exchange update rate compared to competitors (in ms)
Comparison of 2.4GHz receivers sensitivity with analogs 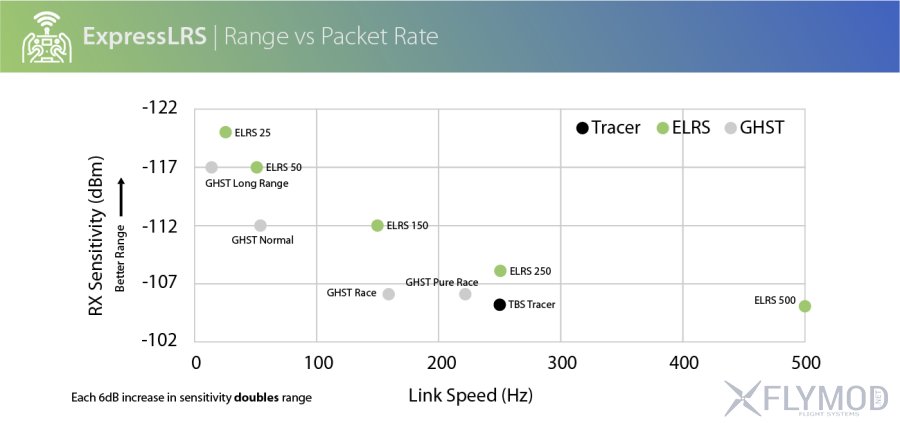
Useful links on ExpressLRS
Supported devices
900MHz transmit modules
- FrSky R9M (2018) (Full support, resistor modification required)
- FrSky R9M (2019) (Full support, no modification required)
- FrSky R9M Lite (Full support, power limitation)
- TTGO LoRa V1/V2 (Full support, V2 recommended w/50 mW power limit)
- Namimno Voyager 900 TX (Full support out of the box)
- HappyModel ES915TX (Full support out of the box)
- HappyModel ES900TX (Full support out of the box, WiFi upgrade support)
- DIY Module (Full support, 50mW limit, limited documentation)
- BetaFPV Nano 900Mhz TX (Full support, 500mW power limit)
900MHz receivers
- FlyMod ExpressLRS 915MHz Receiver (Full support out of the box, WiFi upgrade)
- FrSky R9mm (Full support, OTA version can be used)
- FrSkyR9 Mini (Full support, OTA version can be used)
- FrSky R9mx (Full support)
- FrSkyR9 Slim+ (Full support, OTA version can be used)
- Jumper R900 mini (Full support, can only be flashed via STLink, bad default antenna)
- DIY mini RX (Full support, support WiFi upgrade)
- DIY 20x20 RX (Full support, WiFi upgrade support)
- HappyModel ES915RX (Full support out of the box)
- HappyModel ES900RX (Full support out of the box)
- Namimno Voyager 900 RX (Full support out of the box)
- BetaFPV Nano 900Mhz RX (Full support, WiFi upgrade support)
2.4GHz transmit modules
- DIY JR Bay (Full support, 27dBm, WiFi upgrade support)
- DIY Slim TX (Full support, 27dBm, WiFi upgrade support, fits Slim Bay)
- DIY Slimmer TX (Full support, 27dBm, WiFi upgrade support, fits Slim Bay)
- GHOST TX (Full support, 250mW power, OLED support in ELRS v1.1)
- GHOST TX Lite (Full support, 250 mW power, OLED support in ELRS v1.1)
- HappyModel TX (Full support, 250 mW power)
- BetaFPV Nano 2.4GHz TX (Full support, 500 mW power)
2.4GHz receivers
- GHOST Atto (Full support, initial flashing required via STLINK, then BF passthrough is possible)
- GHOST Zepto (Full support, initial firmware required via STLINK, then BF passthrough is possible)
- DIY 20x20 RX (Full support, easy to replicate, WiFi update)
- DIY Nano RX (Full support, CRSF Nano Footprint, WiFi update)
- DIY Nano CCG RX (Full support, CRSF Nano Pinout, based on STM32)
- DIY Nano Ceramic RX (Full support, CRSF Nano Footprint, WiFi upgrade support, built-in ceramic antenna)
- HappyModel PP RX (Full support, CRSF Nano Pinout, based on STM32)
- HappyModel EP1/EP2 RX (Full support, CRSF Nano Pinout, based on ESP8285, WiFi upgrade)
- BetaFPV Nano 2.4GHz RX (Full Support, WiFi Upgrade Support)
Info
OpenTX version requirements
ExpressLRS requires an OpenTX version of at least OpenTX 2.3.12. EdgeTX 2.4.0 or newer should also work. The OpenTX build must also include CRSFshot parameters as well as support for lua scripts.
A new version is required to support crsfshot (Mixersync), which ensures proper protocol operation and low latency. The right way to find out if your control hardware supports crsfshot is to go to ELRS lua script and check the status line at the very top, in the value 0:200, the second digit should change depending on the selected update rate, if it does not change and stuck, for example at 0:63, 0:250, then you do not support crsfshot and need to update OpenTx. For example: if the selected refresh rate is 100Hz, the top of the script should also change to 0:100.
Connecting an external ExpressLRS transmitter module to the control equipment
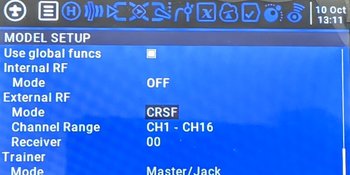
To connect the external transmitting module ExpressLRS, you need to select the externalmodule in the model setup(the internal module should be disabled), as well as the type of connection - CRSF protocol. Further all module control goes through lua script.
Lua script for ELRS module control
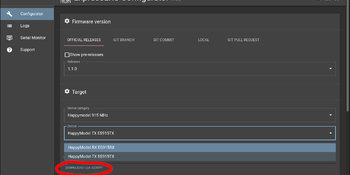
Download the Lua script from the link in the configurator, as shown in the image below. After that, the downloaded file should be placed on the memory card, in the folder \SCRIPTS\TOOLS\. Alternatively, download the file from the link on GitHub (Right-click on the link and select "Save as").
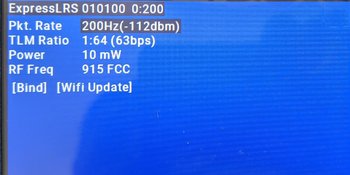
Entering the script through opentx tool(s), you can see the status bar at the top of the script, where the module version is displayed, for example 010100 is version 1.1.0. Then the status displays the number of broken and successful packets, for example 0:200, where 0 is bad packets, and 200 packets that passed successfully, the second number should vary depending on the selected value of the exchange rate in the settings.
From the script options for module management the following settings are available:
- Packet Exchange Rate. The lower the signal update rate, the higher the sensitivity of the receiver and therefore the higher the effective range of the system. Try to find an acceptable balance of these values.
- Telemetry Exchange Rate.
- Output power of the transmitting module
- Radio frequency of exchange (usually does not change, as the module comes with a fixed setting).
The menu below allows you to select the receiver pairing function [BIND], only works with the traditional bind method(binding section). In the menu section [WiFi Update], modules based on ESP chips can be updated via WiFi, see the firmware section for details.
Flashing and updating ExpressLRS receivers
There are several options to update the firmware in the receivers depending on the conditions:
- Updating via Betaflight pass-through is the easiest and most convenient method. It is available when your receiver is already connected to a flight controller (running Betaflight) and communicates via CRSF protocol. This option utilizes Betaflight's ability to route the serial port (UART) of connected devices through the flight controller's direct connection, as if the child device were connected directly to the computer. This mode is initialized automatically by the ExpressLRS configurator when the appropriate firmware mode is selected (Betaflight passthrough). But it works only if there is "live" firmware in the receiver, this method will not work on a clean chip.
- Option of flashing via WiFi. This mode is supported by some receivers based on ESP chip, for example, FlyMod ExpressLRS 915MHz receiver. In the absence of signal, after some time (usually a few minutes, set in the configurator), the receiver will switch to WiFi access point mode, after which the connection point with the name ExpressLRS RX will be available, the password for connection expresslrs. Once connected, you must go to the web browser to the link http://10.0.0.1/ , where you will be able to download the firmware as a binary file through the form of web-interface. The firmware itself must be generated in the configurator by selecting the appropriate target on the basis of your receiver and clicking Build. This mode is available only if there is active firmware in the receiver.
- Option of flashing the receiver via UART with ESP chip. This method is a bit more complicated and requires a USB to TTL converter for flashing to connect directly to the PC receiver (e.g. FTDI or CP2102). In most cases, this type of flashing is relevant only if you have lost the active firmware on your receiver or for some reason the receiver stopped booting and responding.
Before flashing the receiver must be put in BOOT mode, to do this you need to press the boot button on the receiver, then the button can be released. Then in the configurator expresslrs choose the option to flash the UART, specify the desired target, select the port to which the serial port converter is connected and click Build and Flash.
It is possible to flash with third-party utilities, for example esptool. To do this you need to generate and download the firmware as a binary file from the configurator. Example command for flashing the receiver: esptool --port /dev/ttyUSB0 write_flash 0x0000 firmware.bin
- For flashing receivers with STM chip, with broken firmware, you need STLink programmer.
ELRS binding process
There are two variants of bindings ExpressLRS receivers
- The first one isBINDING PHRASE. The original and simple method from ELRS, requires the transmitter and receiver to be flashed with the same bind phrase, after which the devices will be bound by default without requiring any additional actions, which is very convenient.
- The second method, traditional. It is available in case of an empty bind-phrase set when flashing the receiver.
- The remote control must be turned off.
- On the receiver should be three times in a row to turn on and off the power, the LED will flash cycles of two quick lights, which will mean the receiver is ready for pairing.
- Turn on the remote control and run the ELRS control script, select the [BIND] menu at the bottom.
- The receiver will start blinking slowly and then the LED will light up continuously to indicate successful bind.
LED statuses on the receiver
- Continuous glow - a successful connection to the control hardware is active.
- Double fast flashing - receiver in pairing mode.
- Slow equal blinking - receiver in "no signal" status.
- Fast flicker - communication error of the receiver's radio module.
Explanation of the number and functionality of channels
The system supports a maximum of 12 channels. The first 4 channels with full range of values (10bit) are updated with the highest possible rate.
The rest of the channels depending on the mode:
- Standard mode:
AUX1 - 2 positions (1 bit), updated with each frame of the signal, the channel must be assigned to an ARM.
AUX2-AUX8 - 2 positions (1 bit), updated every frame.
- When HYBRID_SWITCHES_8 Mode is enabled :
AUX1 - 2 positions (1 bit), updated with each frame of the signal, channel needs to be assigned to the ARM.
AUX2-AUX7 - 3 positions (3 bits), the channels are updated alternately in a circle.
AUX8 - 16 positions (4 bits), channel updates are in alternating rounds.
Modifications needed to operate transmitting devices with ELRS
- X9D immediately uses 400 kbit/s exchange rate and there is not even an option to downgrade to 115200 bit/s. So no mod is needed for this equipment.
- X10S Express 400k mod is not needed.
- X10S needs modification.
- X12 needs modification.
- QX7 ACCST old style. The story here is the same as when connecting crossfire modules from TBS. In the OpenTX hardware menu there is an option to lower the exchange rate to 115k. ELRS will work fine at 115200 bit/s, but to work at 400 kbit/s and to support higher radio packet rates (e.g. at 2.4MHz), modifications will be needed.
- Modifications are not needed for devices with ACCESS radio standard.
- For the old 2018 version of the R9M transmit module, a pull-up resistor mod is needed.
- To support up to 1W of power on the R9M module, a modification to add a cooling cooler is needed. In theory, the power can be increased up to 2W, if proper cooling is provided.
Additional features
- For stable operation of the system, it is desirable that the receiver and transmitter are flashed with the same version of elrs.
Other ELRS reviews
This article will be updated as new information becomes available.
Share:


Comments
Registration