- My cart
- Prices in: USD
Show prices in:
- Exchange $: 45.4uah
- UA RU EN
Forgot your password?
Authorization withGoogle


Authorization withGoogle
Show prices in:

Great news for all FrSky Taranis owners - we are currently developing a data transfer technology called MSP over S.Port or S.PORT / MSP bridge, which is basically a two-way communication channel between the remote control and the flight controller using SBUS and Smart Port technologies. This in turn opens up a number of new possibilities for configuring various equipment on board FPV drone, for example, setting PID values on BetaFlight controller or controlling TBS Unify transmitter, where it will be possible to quickly and remotely via radio select the channel and transmitter power.
In this article we will look at setting PIDs in BetaFlight firmware via Taranis. Now you no longer need to connect a USB cable to the controller to change a few PID values, it is now enough to go to the script on Taranis and enter the new parameters, the changes will be set "over the air".
Attention! These versions of the software are still in the process of testing and are not in official public releases, the user should understand that perhaps some functions may not work correctly.
In order for Lua scripts to work correctly you need to update your Taranis to the latest OpenTX 2.2.X. In this version they have significantly enhanced the ability to run such scripts, so that they can work with MSP over S.Port and send back data.
You can update OpenTX in the standard way by installing OpenTX Companion from the official site (for Lua scripts to work you need to select the lua option in the Companion settings).
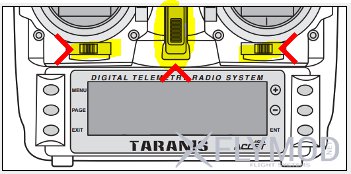
Or you can download the ready firmware files, throw them on the SD card of Taranis in the folder FIRMWARES and activate the installation through BootLoad mode, turning on the remote control as on the picture below.
Next you need to download the Lua script for viewing and setting PID values.
It should be placed on the SD card in the /SCRIPTS/TELEMETRY/ folder. Note that the name of the script file must not exceed 6 characters in Latin.
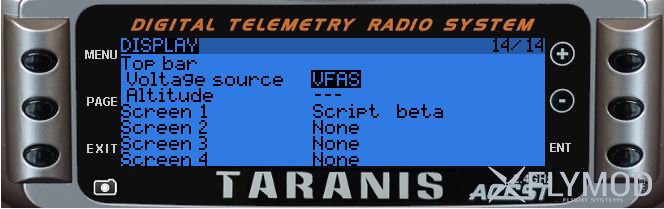
Now the copied script should be placed in the 14/14 control menu of the model in one of the telemetry screens (Screen1\2\3\4) as shown below.
BetaFlight 3.1 firmware is currently in development and debugging status, so you need to download the "nightly" version of the firmware from the link:
http://andwho.sytes.net:8080/job/BorisB_BetaFlight/lastBuild/
In the ZIP archive you will find hex firmware for all major flight controllers. They are downloaded in the usual way via BetaFlight configurator by selecting the firmware on the local disk.
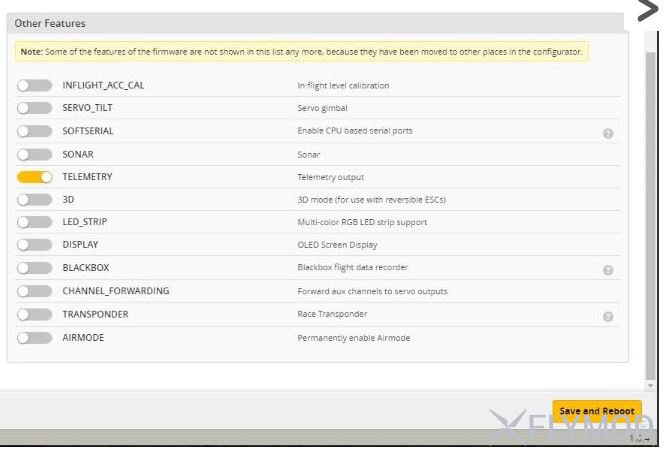
Without enabled ports and telemetry of course nothing will work. But here in principle everything is standard and if you already have a configured PC with SBUS and telemetry through the S. Port, you do not need to configure anything additionally.
The TELEMETRY option must be activated in the configuration window.
In ports it is necessary to include a port for SBUS, which is usually on F3 controllers is located on UART 3 (you need to activate Serial RX). And also on UART 2 must be selected telemetry Smart Port.

To reserve the script in the Taranis main screen, hold the page button until you enter the telemetry screens, then you need to click the same button to the desired screen number where the script is installed, after which your set PID values will be displayed.

That's it, now you can easily and conveniently customize your FPV drone remotely.


Comments
Registration